This primitive "kitchen range" is often used in survival
skills training programs given to missionaries who intend to set
up housekeeping among native tribes far from civilization. Therefore,
the practical cooker/baker could serve nicely in any remote area
where supplies are scarce and the most common building materials
are stone, earth, wood, and salvageable scrap metal.
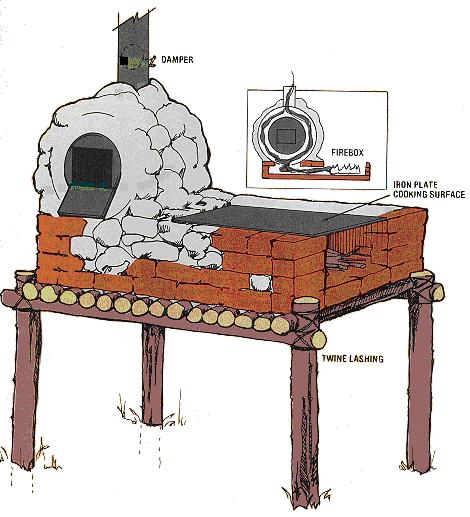
The first step is to build a platform, which simply raises the
cooking area to a convenient working height. This can be done by
driving short poles into the ground and tying crosspieces to the
uprights with a generous amount of baling twine. When that's finished,
top the framework with branches that will be sturdy enough to.provide
a base for the heavy stove.
Next, construct the bottom and three sides of a stone or brick
box, open at one end, that will later hold the fire. To do so, place
a covering of stone on the raised platform and cement the rocks
together with clay or mortar, keeping the surface as smooth as possible
so it'will be easier to clean. Then build up the sides of the firebox
as you would a wall and seal all the chinks. To provide a cooking
surface, cover about two-thirds of the top of the box (toward the
open,end) with a flat plate. A cast-iron sheet is best, but you
can use steel or even a large, flat stone. Remember, though, that
only hard, unlayered rock will do, and the slab must be dried out
by heating it slowly. This eliminates the risk of its cracking or
even exploding during exposure to intense heat.
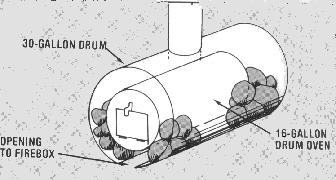
Now it's time to build the oven over the portion of the firebox
that's not covered by the cooking surface. Place a whole 16-gallon
drum inside a 30-gallon drum that's had the front end removed. a
section cut out along its length, and a hole cut for the chimney.
Cradle the smaller drum with! the larger one with rocks and support
both containers with stones at the ends. The larger barrel serves
as a form for the brick or stone that surrounds the entire oven
except for the door and chimney openings. Before reaching the chimney,
the smoke and hot gases pass through the space between the two drums,
heating the oven.
The oven must be fitted with a door. This job is most easily
handled with an oxyacetylene torch, but if necessary, it can be
done with hand tools. Cut a square hole in the metal end of the
16-galIon drum, make a cover (each of its dimensions should be about
an inch bigger that those of the opening), then- with hinges at
the bottom so it can swing out of the way-attach the door to the
oven and make or buy a latch for the closure.
The chimney, which consists of a pipe set into a hole in the
arch above the oven, must fit tightly and be cemented with clay
or mortar. You'll also need to put a damper in the pipe so that
the draft, and therefore the amount of heat produced, can be controlled.
Of course, this is just one possible form of simple oven. The
Indians of the Southwest, and other people around the world achieve
the same results by building a stone beehive-shaped structure, with
an opening in the front near the bottom and a smoke hole at the
top. This chamber is heated through for a couple of hours, the ashes
are raked out, and the stored-up heat in its stones can then be
used for baking. This form of oven is a little more awkward to use,
but it does work well. Although the Indian version is usually built
on the ground and therefore requires a lot of bending over, raising
the stove on a platform eliminate the need for stooping.
From Mother's Energy Efficiency Book Copyright 1983 ISBN
0-938-43205-2